Introduction
This is a first in a series of articles to get some one up and running with iOS development. iOS is the operating system that runs on the iPhone, iPad, and iPod Touch. While I will use an iPhone for my example code you could apply the code to all three devices.
Pre-requisites
To take advantage of this article you’ll need to already have an understanding of object oriented concepts and you’ll need to know a C-language (C, C++, C#) and know what is meant when I use terms such as object, class, function, method, variable, and so on. I’m making the assumption that you have never looked at Objective-C. I’ll introduce you to the Objective-C language and then will walk you through some programming scenarios that I think will best get you started. As things are in any programming environment there will be more than one way to get a task accomplished or more than one syntax to express something. Exhaustively presenting all the possible ways that something can be expressed is not reasonably possible. So keep in mind that there are other ways of accomplishing what I explain here.
Selecting Hardware
A minimally sufficient development environment for iOS applications is composed of just an Intel based Mac. Owning an iPhone, iPod, or iPad is optional but extremely helpful.
If you are looking for the absolute best hardware to use for developing for iOS it’s easy to say “get the top of the line Power Mac with all the options you can.” But for most of us (myself included) there’s going to be a cost constraint when selecting the development hardware that you use. The absolute minimum hardware configuration that you need will be an Intel based Mac running Snow Leopard. The least expensive Mac that you can purchase new is the Mac Mini. Compared to the price of the lowest cost PC that you can purchase the Mac Mini will look quite pricy. But I’d suggest shelling out a little more money to get a portable computer. With the Mac Mini you’ll be confined to developing when you are in the room in which it is setup. With one of the Mac Books you might also find yourself developing when you are relaxing in front of the TV or in some other comfortable spot.
Depending on your needs if you find that you don't need the latest version of the iPhone for your intended applications it's a good idea to shop around for bargins when Apple is releasing either a new iPhone or new Macs. I was able to acquire an inexpensive iPhone from some one else that was upgrading and found a Mac Mini on sale from a store that was clearing their shelves for newer units. (I've since then moved onto a Mac Book Pro after wanting to be able to develop from othe rooms in the house)
My initial setup was made of an intel Mac Mini I found on sale and a contract free iPhone I purchased from some one upgrading to the next generation phone
You don’t need to have an iPhone, iPod, or iPad to get started (hereon I will collectivly refer to these devices as iOS devices). The SDK comes with simulators (or emulators if that’s the terminology that you are accustomed to). But the simulators have limitations; you’ll find that you’ll want to have real hardware when you are developing anything that uses an accelerometer.
If you plan to use real hardware for your testing it’s not sufficient to have just the needed hardware and software. You will also need to have a subscription to Apple’s iPhone Development Program (cost about 99 USD per year).
Do I need to have a Macintosh?
I get a lot of traffic to my personal web site because of a service I reviewed that was designed to allow those without a Mac to do iPhone development. I don’t want to go into a discussion of the service here so I’ll just tell you yes, it is mandatory that you have a Macintosh. The only sanctioned hardware for iPhone development is an Intel based Macintosh. Don’t waste your time trying to circumvent this.
Installing the SDK
The iPhone SDK is already present on the installation disk for OS X Snow Leopard. Don’t use that one. There will always be a more up to date version available for download. Weighing in at about 3 gigs the SDK could take some time to download depending on the speed of your connection. To get the installation go to http://developer.apple.com. You’ll see a link to the iPhone Dev center. Clicking on it will take you to the page for the SDK download. Apple sometimes has beta versions of the SDK available for download available. But unlike the current version of the SDK the beta versions are not available for all to download. You must be a registered developer with a subscription to have access to them.
The DMG for the SDK will download and automatically mount. Run the installation and after it finishes you’ll be ready to get stated with development.
Getting Started with Objective-C
Programs created for the iPhone are written in Objective-C. Objective-C is often described as a strict superset of the C language. Others call it C with object oriented concepts applied. The first time I saw it I have to say I felt like I had no idea what I was looking at. It doesn’t look like any other programming language that I know. But after you get through your first few programs you’ll find it to be much easier to follow. Being a strict superset of C if you already have algorithms that are written in C you should be able to port them over to the iPhone. The following chart shows some expressions that mean close to the same thing in C and Objective-C.
C/C++ | Objective-C |
#include "library.h" | #import “library.h"” |
this | self |
private: | @private |
protected: | @protected |
public: | @public |
Y = new MyClass(); | Y = [[MyClass alloc] init]; |
try, throw, catch, finally | @try, @throw, @catch, @finally |
Within Objective-C both your class definitions and objects instantiated from those classes are instances of a struct called ‘id.’ The definition of id is as follows:
typedef struct  objc_object {
     Class* isa;
} *id;
Since this is the foundation of all objects within Objective-C you will find an “isa” member on every Objective-C object that refers to its type data. Instances of “id” are all pointers so you can distinguish one from another by comparing their addresses. There is a special id value named nil whose pointer value is set to zero.
Classes
In Objective-C you declare a class’s interface separate from its implementation. You have probably seen a similar separation of interface and implementation in C++ programs where a classes interface is defined in a *. h file which the implementation is in a *.cpp file. Likewise in Objective-C the interface is defined in a *.h file and its implementation in a *.m file.
Every class you create in Objective-C should either directly or indirectly derives from the NSObject base class. The base class doesn’t look to do much at first glance but it contains functionality that the runtime need for interacting with the object. You don’t want to have to implement this functionality yourself.
Class Interface Declaration
To declare a new class you start off by declaring the classes interface. The class interface declaration starts with the @interface compiler directive and ends with the @end directive. You’ll see a set of open and close curly-brackets within a class interface declaration. Just remember that the closing bracket is not the end of the class interface definition! Here is a generic class definition
@interface YourClassName: TheSuperClass
{
     instance members
}
Message Declarations

@end
The declaration for the instance members doesn’t differ from one you might expect from one of the other C languages. BOOL isValid; float width; NSString* name;
A class automatically has access to all the classes in its inheritance ancestry. So you can refer to classes of any of its base types without doing anything special. If you are referring to a class that is not in its inheritance chain then you will need to make a forward declaration for that class. The following makes a forward reference to two classes, Employee and Accountant.
@class Employee, Accountant;The declaration of messages is different. A message can either be associated with the class or associated with an instance of that class. Class methods are preceeded with a plus (+) while instance methods are preceded with a minus (-). The default return type of class messages are id instances. To change the return type to something else you’ll need to put a return type in parens just before the class name. Note that this is the same syntax that you would use to cast a variable from one type to another. Here’s an example of a simple message declaration
- (int)GetSize;
Message parameters immediately follow a message name. They are colon delimited and their types are indicated with the same syntax that one would use to cast to a different type.
-(float) Power:(float)width:(float)height;
Class Implementation
The class implementation is in a *.m file. Just as you would in C++ you will need to include the classes header file when you are writing the implementation. Instead of using an #include directive to do this you will use an #import directive. The syntax for declaring the implementation is similar to the syntax for declaring the interface, only you replace the @interface directive with an @implementation directive. One possible syntax for starting off the implementation follows.
#import “YourClass.h”
@implementation YourClass
   your message implementations go here
@end
Optionally you could re-declare the instance variables and super class here, but it’s not necessary. The message implementations start off the same way as a message. But instead of terminating the declaration with a semicolon(;) you append a curly bracket pair enveloping your implementation.
- (float)square:(float)x

{
     return x*x;
}
Methods, Messages, and Object Communication
Most object oriented material you come across will refer to messages being sent among objects. Most of the time you’ll see this implemented through methods. In most cases the words method and message can be used interchangeably. Objective-C sticks with using the terminology “message.” So I’ll adhere to that standard within this document.
The syntax for sending a message (which means the same thing as “calling a method”) is to enclose the name of the target object and the message to be passed within square brackets. So in C++/C# you may have send a message using the following syntax
myObject.SomeMethod();
Within Objective-C you would accomplish the same thing with the following:
[myObject SomeMethod];
Passing parameters to messages is a little different than what you are used to. For one parameter things make perfect sense and don’t need much of an explanation. Just place a colon after the name of the message followed by the parameter value.
[myObject SomeMethod:20];
When you want to pass more than one argument things could potentially look messy.
[myObject SomeMethod:20:40];
As you more arguments are added to a message the code could potentially become less readable; I wouldn’t expect a developer to memorize the parameters that a method takes. Even if he or she did then there’s still mental effort involved in identifying what parameter is associated with which value. For clarity you could do something like this:
[myObject SomeMethodA:20 B:40];
In the above it appears that I’ve named the parameters ‘A’ and ‘B’ and that parameter ‘A’ is oddly concatenated to the message name. What you may not have realized is that the parameter names and colons are all parts of the message name. So the full name of the message is SomeMethodA:B:.
If a message returns an object a message you can pass a message to the returned message through a nested call. In C/C# you would have code that looks like this:
myObject.SomeMessage().SomeOtherMessage();
Whereas in Objective-C the same thing would be accomplished with this
[[myObject SomeMessage] SomeOtherMessage];
Prototypes
Prototypes are much like weakly implemented interfaces. In other programming languages if a class implements an interface then within the classes declaration there is a statement that shows that it is implementing a certain interface. With prototype the class only needs to implement certain methods to conform to a prototype. There doesn't need to be any mention to the prototype definition that it is conforming to.
Class Instantiation and Initialization
An instance of a class is instantiated using the alloc method of the class. alloc will reserve the memory needed for the class. After the memory is allocated you’ll want to initialize it. Every class that has instance members will need to have an init method defined.
myObject = [[MyClass alloc] init];The first time I saw the above pattern I made the mistake of thinking that it was equivalent to the following:
myObject = [MyClass alloc];
[myObject init];
They are not equivalent. The value returned by init may not be the same as the value returned by alloc. So you should always combine the alloc and init messages when doing the assignment.
When you implement your own initializer for a class the initializer should either return self to signal that it was successful or nil to signal that it was unsuccessful. The return type for an initializer should always be id. This is to explicitly show that the type returned by the initializer may be of another type.
If you need to pass a parameter to your initializer then it will generally have init as the prefix for the initializer name. For example if I had an initializer that required a date I may call it initWithNSSDate.
Memory Management
Objective-C classes keep track of a reference count. The count can be read through -(NSUInteger)retainCount; at any time (though other than satisfying cutiousity there aren't many scenarios that call for needing to do this). When the reference count of an object reaches zero then it is released. For the most part the details of this reference counting are abstracted away and the methods related to reference counting are presented as methods for taking ownership of an object (which increments the reference count) or relinquishing ownership of the object (decrementing the reference count).
The general rule is that if you've created an object with any method prefixed with alloc or new or had copied the object from an existing object then you are responsible for releasing the object. If you've taken ownership of an object (with retain) then you must also release it. Note: If you don't own it then don't release it. Calling autorelease on an object will add it to a pool of objects to be released and deallocated at some point in the future.
Copying an Object
When copying an object if that object's member variables contain pointers to other objects there are two ways to go about copying it. On way is to copy the pointers from the original object to the object being created. This method of copying (also called a shallow copy) will result in both the new object and the original object to share the same instances of objects that make up their members. So if a change occurs within a member object of one class it will also afect the member within the other since they are really the same instance. The other method of copying is to create new isntances of the member objects when the new object is created. The end result of this is that changes to an instance object on one instance of the object will have no impact on the other. The original and copied object are completly independent in this case. Both approaches have their advantages and disadvantages when one looks at the result that the two copy methods in terms of memory consumption and potential side affects. There can exist scenarios that have a mixture of shallow and deep copy techniques. If you created a class and implemented a deep copy but one of the instance members implements a shallow copy then you could end up with an instance member of an instance member refering to the same object as an instance member of an instance member in the object you just copied. (that's potentially confusing, but I can think of no clearer way to say it)
There should be consistency between how a class's copy method works and how the classes set methods work. If the set method on the class creates new new instances when performing assignment the the copy method should be a deep copy. If the set method saves the instance that is passed to it then the copy method should be a shallow copy.
-(void)SetMyMemberVariable:(id)newValue
{
    [myMmeberVariable autorelease];
    myMemberVariable = [newValue copy];
}
Implementation of a set method that creates a new isntance of an object.-(void)SetMyMemberVariable:(id)newValue
{
[myMemberVariable autorelease];
myMemberVariable = [newValue retain];
}Implementation of a set method that copies a reference to existing instance of object.Low Memory Conditions
The user interface for your iOS programs will be controlled through a class derived from UIViewController. There are two methods on the class that are involved in low memory handling. One is didReceiveMemoryWarning which was in existence before iOS 3. As of iOS version 3 and later there is a method named viewDidUnload. When the device is low on memory the OS will destroy the views if it knows that the views can be reloaded and recreated again. When this method is called your class should respond by releasing its references to view objects.
Constructing Hello World
If you’ve skipped the Objective-C introduction and tried to jump straight into creating a program you are about to be lost in a sea of cryptic notation and nonsensical glyphs. I’ve you’ve read though the primer then you’ll have no problem understanding what follows. We are going to build a “Hello World” program. The program will have one button and a text field. When someone clicks on the button the text field will display the words “Hello World.” I’ll also be taking this as an opportunity to cover some concepts that would otherwise not make sense in the absence of this exercise.
Using either the Finder or Spotlight startup Xcode. When the Xcode welcoming screen appears select the option to “Create a new Xcode project”.

Ensure that “Application” is selected under iPhone OS to see a list of the type of iOS projects that you can create. Select “View-based Application” and make sure that the “Product” dropdown has iPhone selected. Once you’ve done this click on the “Choose” button end type “MyHelloWorld” when prompted for the name of the project.

A new project is generated and at this time is in a state such that it can be run. Make sure your iOS device is not connected to the computer (if you try to deploy to your own personal device right now it will fail) and select “Build and Run.” Your project will be compiled and copied to the emulator and run. The result is pretty boring looking; it is just a blank screen since we haven’t added anything to the user interface yet. You can click on the red button in Xcode to stop the program When the program terminates you’ll see it’s icon in the iPhone simulator. It’s just a plain white rounded square. Let’s change that.
If you want to change the program’s icon make a new 57x57 pixel PNG image. Don’t worry about rounding the corners or doing the other things that make it look iPhone styled; that will happen automatically for you. Once you’ve made your image in your editor of choice navigate to it in the Finder. Click-and-drag the icon to the Resources folder in Xcode. You’ll be asked whether you want to copy the file into the project’s folder or if you want to only copy a reference. It is usually a good idea to copy the file.
In the Resources folder find the file HelloWorld-Info.plist and click on it. A *.plist file is a property list that contains some general information about the application. Clicking on the plist file will cause the property editor to open. One of the available properties is named “Icon.” Double-click on the property sto begin editing it and type the name of your icon file. The next time you build and run your application after you close it you’ll see your icon.
The Xcode window is divided into three panes. The horizontal pane on the top has a list of files in it. Look for the file named MyHelloWorldViewController.XIB and double-click on it. This will open up the interface builder.

The Interface Builder windows.
Among other windows you should see a blank iPhone surface ready for you to layout controls on it. If you don’t see this then double click on the “View” icon in one of the windows that appears to display the layout surface. Scroll down in the “Library” window until you see the Text-Field control. Drag an instance of this control onto the design surface somewhere on the upper half of the screen. Also drag a “Round Rect Button” to the design surface somewhere close to the text field.
Select the button and then go to the Identity tab in the properties window. Set the Name for the button to “MyButton”. Select the text field and set its name to “MyText”. Save your changes and then go back to Xcode and run your project again. This time you’ll see the text field and the button on the screen.

The tabs from left to right are Identity, Connections, Size, and Identity.
We want to change the program so that when the user clicks on the button the text “Hello World” displays in the text field. But if you look through our source code it will become apparent that neither the button nor the text field are immediately available for us to manipulate in the code.
IBAction and IBOutlet – Responding to Actions and Providing Feedback
We can have the button send a message to our code when it is clicked. We need to declare an IBMethod in our code so that the button has something to which it can send its message. Open “HelloWorldViewController.h” and in the line after the closing bracket for the interface definition add the following.
- (IBAction) myButtonWasClicked:(id)sender;
As you may have gathered from reading the Objective-C primer you’ll also need to add an implementation for this method to the HelloWorldViewController.m file. In the line after the @implementation directive type the following:
- (IBAction) myButtonWasClicked:(id)sender

{
     NSLog(@”The button was clicked”);
}
Open the HelloWorldViewController.xib in the interface builder. Holding down the control key click-and-drag from your button to the “File’s Owner” icon. A sub-menu appears allowing you to select a method. Select the myButtonWasClicked method.
Run the project and then type Shift-Command-R in Xcode to open the console. Whenever you click on the button you will see the text “The button was clicked” appear.
Our final goal was to display a message on the screen to the user; there’s more work to be done. While the IBAction methods allowed us to receive notification of something happening they don’t help much in actively changing the contents of the text field. We need to first get or hands on an instance of that text field. But the text field isn’t declared within our code. It is declared inside of the XIB file. To get a reference to the text field we must declare an outlet. An outlet is a variable that is automatically assigned a value by Cocoa at runtime.
Within the header file for the view type the following under the method that you created.
@property (retain) IBOutlet UITextField *myTextBox;
Copy the same thing into the area for the instance variables and remove the @property (retain) part from it.
In the implementation add the following
@synthasize myTextBox;
The code in the myButtonWasClicked method also needs to be changed. Within this method set the text on the myTextBox instance to “Hello World”.
myTextButton.text=@”Hello World”
The next step is to associate the text field with this property from the interface builder. From within the interface builder right-click on the “File’s owner” module and find the myTextBox outlet. While holding down the control key click-and-drag from the outlet to the text field. If you run the program now when the button is clicked “Hello World” will appear in the text box. We've only looked at the textbox. But the interactions with many other visual controls is the same. If you add a slider to the interface, an IBAction method to my class, and then associate the method with the slider I can receive notifications when the slider value is changed.
The last step is a cleanup task. As described in the low memory section if the iPhone becomes low on memory it will begin to destroy views to clear up memory. Well need to clear our references to the view objects when this happens. Also when the view is being deallocated we need to release ownership of the view objects we reference in our code. You can see how bow both of these were implemented in the -(void)viewDidUnload and -(void)dealloc methods in the full code below.
The source code below contains both our the helloWorld functionality along with displaying the value of a slider.
#import
@class NSTextField;

@interface HelloWorldViewController : UIViewController {
    IBOutlet UITextField * myTextBox;
    IBOutlet UISlider    * mySlider;
    IBOutlet UITextField * mySliderText;
}
@property (retain) IBOutlet UITextField * myTextBox;
@property (retain) IBOutlet UISlider    * mySlider;
@property (retain) IBOutlet UITextField *mySliderText;

- (IBAction) myButtonWasClicked:(id)sender;
- (IBAction) mySliderWasMoved:(id)sender;

@end
The class interface declaration from HelloWorldViewController.h#import "HelloWorldFinalViewController.h"
@implementation HelloWorldFinalViewController
@synthesize myTextBox;
@synthesize mySliderText;
@synthesize mySlider;
- (IBAction) myButtonWasClicked:(id)sender
{
NSLog(@"The button was clicked");
myTextBox.text=@"Hello World";
}
- (IBAction) mySliderWasMoved:(id)sender
{
NSLog(@"The Slider was moved");
UISlider *slider = (UISlider*)sender;
float sliderValue = [slider value];
NSString* sliderValueText = [NSString stringWithFormat:@"The slider's current value is %f", sliderValue];
mySliderText.text=sliderValueText;
}
// Override to allow orientations other than the default portrait orientation.
- (BOOL)shouldAutorotateToInterfaceOrientation:(UIInterfaceOrientation)interfaceOrientation {
return YES;
}
//View is being destroyed to free memory. Clear
//out our references to view obejcts.
- (void)viewDidUnload {
self.textBox=nil;
self.mySliderText=nil;
self.mySlider=nil;
}
// during a dealloc release our hold on the view objects
-(void)dealloc{
[myTextBox release];
[mySliderText release];
[mySlider release];
[super dealloc];
}
@end
The class implementation from HelloWorld.mThe two things to take from this example program are how to get a reference to a UI object created in the interface builder, and how to receive messages from UI objects.
Deploying to a Real Device
Now that you’ve written your first program those of you with a real device probably want to deploy it to that device. Before you can copy your program to a real device you *must* complete the App store registration with Apple. Until you do this you will not be able to complete the provisioning process.
Connect your iOS device to your computer. In Xcode change the dropdown so that instead of attempting to run the program in the simulator Xcode will run the program on an actual device. When you attempt to run the program you’ll get a failure notice stating that the device doesn’t have a provisioning profile. If you select “Install and Run” from the error dialog you’ll encounter another failure about the provisioning profile not being found.
To provision your device you’ll need to have your developer certificate. Go to the iPhone Developer Portal (http://developer.apple.com/iPhone) and log in with your apple ID. On the left hand side there is a link that will take you to the provisioning page. Click on the link and select “Launch Assistant” from the bottom of the page. Click on “Continue” when the Development Provisioning Assistant welcome window opens. On the next screen you’ll have toidentify the application you are developing. Click on “Create a new App ID” and select “Continue.” On the next string you enter a description or name for the application (be creative!). Following that you have to identify the Apple device that you are using for development. Select “Assign a new Apple device.” You’ll be asked for the device’s description and Device ID.
The Description can be almost any name. If you only have one iOS device then you really won’t care what you put in there. If you have more than one then you’ll want to put something here that will allow you to easily identify which device you were using at the time. The Device ID can be found in the Xcode Organizer. Switch back to Xcode and select the Window menu and then select “Organizer.” When the organizer opens you will see your iOS device listed on the left. Select it. You may see a button labeled “Use this device for development.” If you do then click on it. When your device information is displayed at the top of the screen look for the value labeled “Identifier” and copy it to your clipboard. Go back to the Development Provisioning Assistant and past it in Device ID and click on Continue. You’ll see a confirmation that your certificate was created. When you go to the next screen you need to assign a name to the profile you just created. After clicking on Continue two more times you will be able to download your provisioning certificate. After downloading your certificate go back to the Xcode Organizer and click on the “+” button in the provisioning area. In the window that opens navigate to your provisioning file and select it. Once you do this your device will be provisioned. You should be able to run the project on your device now. Every now and then when I go through the process of deploying the provisionin certificate to the device it doesn’t work. When this happens I have to disconnect and then reconnect my iDevice one or two times before it will work.
Watch Out, Provisioning Profiles Do Expire!
The provisioning profile copied to your device is only good for about three months. After it expires any executables on your device associated with the profile will cease to function. If you want to see when a device's provisioning profile expires you can view it in the Settings menu. Navigate to Settings->General->Profile to view your current provisions.
String Parsing, Formatting, and other Text Manipulation
The base class for strings is the NSString class. The NSString class is immutable, so the string it contains doesn’t change. There is also a subclass named NSMutableString whose contents can be changed. The NSString class stores Unicode characters. The length of a string can be probed through its length method and the character at a specific location in the string can be probed with the characterAtIndex method.
There are several ways that a string can be initialized. One way (that you’ve already seen by now) is to envelope literal text within a quotation marks and prefix it with the at-sign (such as @”Hello World!”). If you need to create a string from other data (such as an integer value) you can use the class method stringWithForm. The method takes a formatting string that is similar to the formatting strings that you may have used in C/C++. The following code results in the string “There are 12 items in a dozen.”
NSString* myString = [NSString withStringFormat:@”There are %d items in a dozen.”, 12];If you have a numeric value represented as a string you can easily convert it back to a numeric value with one of the xxxValue methods (where xxx can be int, integer, double, bool, float, or long).
There are a lot of other string manipulation methods available and I can’t cover them all here. But I encourage you to glance through the NSString documentation to learn more about the string manipulation methods available. I well use a few more of the available methods as relevant within this document.
Data Persistence
There are multiple ways of persisting data on an iOS device. If you wanted to use traditional C-language IO you could use fopen and its related functions to manipulate files. I won’t cover that here. Instead I’ll cover a few of the solutions specific to iOS.
Getting your Application’s Storage Path
On iOS devices your application is sandboxed. There are only a few folders that your application can write to. There is a /Documents folder for information that you need to persist and be backed up regularly. There’s a /Cache folder where you can place information that should be available between launches but not backed up by iTunes. And there is a /tmp folder for information you only need while the application is running. It cannot read or write to any other location on the device. You can get the path to your application’s /Documents folder using the function NSSearchPathForDirectoriesInDomain(). This function exists for both iOS and Mac OS X. You’ll find that it won’t work with all of the options available; either because the option isn’t supported on iOS or because your application doesn’t have permission to use certain options.
This function returns an array of directories that meet a given criteria. Our initial use of it here is to retrieve a single directory so when we retrieve the path to our Documents folder we will get an array of one item. The first argument that we must pass to the function is the constant NSDocumentDirectory. As the name implies this tells the function that we want the Documents folder. The second parameter is the constant NSUserDomainMask. This specifies that we want to restrict our search to our applications folder.
NSArray *myPathList =
NSSearchPathForDirectoriesInDomains(NSDocumentDirectory,NSUserDomainMask, YES);
NSString *myPath = [myPathList  objectAtIndex:0];
To construct a file name for our reading or writing purposes we only need to concatenate a file name to our path. NSString has a method just for that purpose.
NSString *myFilename = [myPath stringByAppendingPathComponent:@”fileName.txt”];
For temporary files there is a function that takes no parameters and returns a path that can be used for temporary files. Its name is NSTemporaryDirectory();
Having constructed your file name you can use it for one of the data persistence APIs.
PList
PList (or properly list) are easy to use. If you make an in-memory hierarchy of data using only a certain set of objects then that hierarchy can be written to a file or loaded foam a file all at once. As the developer you don’t have to worry about serializing your data. This is done for you. A disadvantage that come from using this solution is that even if you make a small change to your data you must rewrite the entire file; you can’t make incremental changes. The following are the classes that you can use when making an object hierarchy for a PList:
NSArrayNSDataNSDateNSDictionaryMutableArrayNSStringNSMutableStringNSNumber
writeToFile method. It needs a file name and a value for the atomically parameter. If Atomically is set to yes then instead of saving directly to the target file the data will be stored to a temporary file and then moved to the destination file name. It takes longer, but is much safer. If the device crashes you are less likely to end up with a file in a corrupted state. To load the contents of the file we can just instantiate the root element and use the initialization method initWithContentsOfFile. This method takes the file path as it’s only argument and will take care of building the entire hierarchy as it populates the data. In the following code example I made use of a PList to save data to a file. I made a simple interface with three textboxes (for data) and two buttons to invoke the save and load functionality.
While not visisble very where there is also a label control below the buttons. When the data is loaded or saved the path to the file is displayed there. When the save button is clicked the contents of the text boxes are copied to an NSArray and saved to a files with the
writeToFile method. When the load button is clicked a new NSArray is created and initialized with the initWithContentsOfFile method. 
This is a screenshot of the data persistence example being built.
If you want to see whether or not the file is really saving run the program, save some text, and then close the program. If you run it again it will be able to reload the data.
#importClass interface declaration for data persistence example.@interface DataPersistenceExampleViewController : UIViewController { IBOutlet UITextField* textBox00; IBOutlet UITextField* textBox01; IBOutlet UITextField* textBox02; IBOutlet UILabel* storageLocationLabel; NSString* storagePath; } @property (retain) IBOutlet UITextField *textBox00; @property (retain) IBOutlet UITextField *textBox01; @property (retain) IBOutlet UITextField *textBox02; @property (retain) IBOutlet UILabel *storageLocationLabel; @property (retain) NSString *storagePath; - (IBAction)saveButtonClicked:(id)sender; - (IBAction)loadButtonClicked:(id)sender; @end
#import "DataPersistenceExampleViewController.h"

@implementation DataPersistenceExampleViewController
@synthesize textBox00;
@synthesize textBox01;
@synthesize textBox02;
@synthesize storageLocationLabel;
//@synthesize storagePath;

- (IBAction)saveButtonClicked:(id)sender
{
    NSArray*    valueList = [NSArray arrayWithObjects: textBox00.text,textBox01.text, textBox02.text,  nil];

    NSArray *myPathList = NSSearchPathForDirectoriesInDomains(NSDocumentDirectory, NSUserDomainMask, YES);
    NSString *myPath = [myPathList objectAtIndex:0];
    storagePath = [myPath stringByAppendingPathComponent:@"myData.txt"];

    storageLocationLabel.text = storagePath;

    [valueList writeToFile:storagePath atomically:true];

}

- (IBAction)loadButtonClicked:(id)sender
{

    NSArray *myPathList = NSSearchPathForDirectoriesInDomains(NSDocumentDirectory, NSUserDomainMask, YES);
    NSString *myPath = [myPathList objectAtIndex:0];
    storagePath = [myPath stringByAppendingPathComponent:@"myData.txt"];
    NSArray* valueList = [[NSArray alloc] initWithContentsOfFile:storagePath];

    textBox00.text = [valueList objectAtIndex:0];
    textBox01.text = [valueList objectAtIndex:1];
    textBox02.text = [valueList objectAtIndex:2];
}

- (void)didReceiveMemoryWarning {
    // Releases the view if it doesn't have a superview.
    [super didReceiveMemoryWarning];

    // Release any cached data, images, etc that aren't in use.
}

- (void)viewDidUnload {
    self.textBox00=nil;
    self.textBox01=nil;
    self.textBox02=nil;
    self.storageLocationLabel=nil;
}


- (void)dealloc {
    [textBox00 release];
    [textBox01 release];
    [textBox02 release];
    [storageLocationLabel release]
    [super dealloc];
}
@end
Implementation for the Data Persistence example.Writing Files with Archivers
While PList are easy to manipulate they data types that you can store in them are rather basic. Archivers can write objects of any type to a file as long as that object conforms to the NSCoding protocol. TheNSCoding defines messages for reading and writing an objects state. When an object is being saved to a file its encodeWithCoder: method is called so that it can express its state information. During unarchiving (When the object is being read back from the file) the initWithCoder: method is called and the information that had previously been saved by the archiver is provided so that the object can reinitialize itself. Both messages receive on parameter of type
NSCoder. The NSCoder object has various methods for encoding different data types such as Booleans, bytes, strings, and other types of objects. For each encoding method there is also a decoding method. Encoding Method | Decoding Method |
encodeBool:forKey | decodeBoolForKey |
encodeInt32:forKey | decodeInt32ForKey |
encodeArrayOfObjCType:count:at | decodeArrayOfObjCType:count:at |
Working with the Accelerometer
The accelerometer within the device detects forces of acceleration. The force of gravity on Earth is equal to the force that an object would experience if it were accelerating at 9.81 meters/second^2. So a device that isn’t being moved will detect a force in the direction that gravity is pulling it. If the device were in a free-fall it’s accelerometer would have a reading that is close to zero (take my word for this and please don’t test it by dropping your device). The accelerometer’s reading are composed of measurements along the X, Y, and Z axis, so the accelerometer in the iPhone can detect movement in any direction.
Every application has access to a single
UIAccelerometer instance to read the accelerometer data. You don’t instantiate this instance directly. Instead you retrieve it through the class method sharedAccelerometer on the UIAccelerometer class. Once you have an instance of this class you provide a delegate that will receive the data and an update interval. The smallest update interval is 10 milliseconds which will cause 100 updates per second. Most applications won’t need updates this often. When you no longer need accelerometer data you can set the delegate to nil to stop receiving updates. You shouldn’t leave the update mechanism active when you don’t actually need accelerometer data. Doing so can contribute to a faster draining battery. The delegate method that you implement is named
accelerometer:didAccelerate:. When this method is called it will receive both a reference to the accelerometer and the acceleration readings. According to Apple documentation the following are recommended update frequency bands:
Frequency (Hz) | Usage |
10-20 | Getting current orientation of device |
30-60 | Games and other real-time input applications |
70-100 | For detecting high frequency motion such as the user hitting the device or shaking it quickly. |
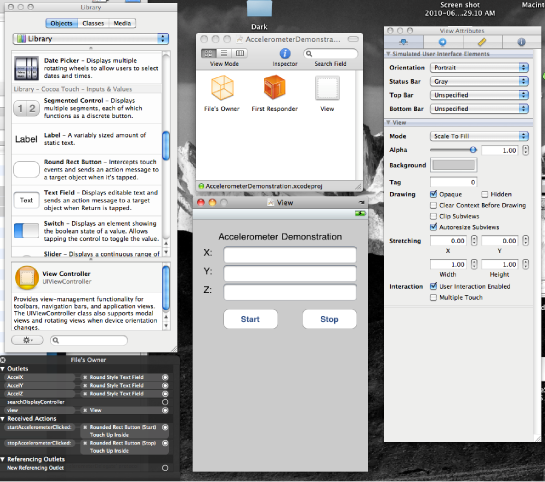
UIDevice class. To retrieve the device’s orientation you must first call the UIDevice’s beginGeneratingDeviceOrientationNotifications. Once this is called you can either read the current orientation from the orientation property. You can also subscribe to UIDeviceOrientationDidChangeNotification. In either case if your application nolonger needs orientation events it should call endGeneratingDeviceOrientationNotifications to turn off the accelerometer and conserve power. For a demonstration I'm building a program that will read the values from the accelerometer and display them on the screen

#importThe class interface declaration for the accelerometer example@interface AccelerometerDemonstrationViewController : UIViewController { IBOutlet UITextField* AccelX; IBOutlet UITextField* AccelY; IBOutlet UITextField* AccelZ; UIAccelerometer *myAccelerometer; } @property (retain) IBOutlet UITextField *AccelX; @property (retain) IBOutlet UITextField *AccelY; @property (retain) IBOutlet UITextField *AccelZ; -(IBAction)startAccelerometerClicked:(id)sender; -(IBAction)stopAccelerometerClicked:(id)sender; -(void)accelerometer:(UIAccelerometer *)accelerometer didAccelerate:(UIAcceleration *)acceleration; @end
#import "AccelerometerDemonstrationViewController.h"


@implementation AccelerometerDemonstrationViewController
@synthesize AccelX;
@synthesize AccelY;
@synthesize AccelZ;


-(IBAction)startAccelerometerClicked:(id)sender {
    [[UIAccelerometer sharedAccelerometer] setUpdateInterval:0.20] ;
    [[UIAccelerometer sharedAccelerometer] setDelegate:self];

}

-(IBAction)stopAccelerometerClicked:(id)sender {
    [[UIAccelerometer sharedAccelerometer] setDelegate:nil];
}

-(void)accelerometer:(UIAccelerometer *)accelerometer didAccelerate:(UIAcceleration *)acceleration {
    [AccelX.text release];
    [AccelY.text release];
    [AccelZ.text release];

    AccelX.text = [NSString stringWithFormat:@"%f", acceleration.x];
    AccelY.text = [NSString stringWithFormat:@"%f", acceleration.y];
    AccelZ.text = [NSString stringWithFormat:@"%f", acceleration.z];
}

- (void)didReceiveMemoryWarning {
    // Releases the view if it doesn't have a superview.
    [super didReceiveMemoryWarning];

    // Release any cached data, images, etc that aren't in use.
}

- (void)viewDidUnload {
    self.AccelX = nul;
    self.AccelY = nul;
    self.AccelZ = nul;
}


- (void)dealloc {
    [AccelX dealloc];
    [AccelY dealloc];
    [AllocZ dealloc]
    [super dealloc];
}

@end
The implementation for the Accelerometer example.I could have a complete discussion alone covering math equations and algorithms that are helpful when dealing with the accelerometer. For now I'll just mention two that I've found helpful when working with an accelerometer in previous programs. The first equation is to get the magnitude of the accelerometer value. For a device that's not moving this number should be close to one (though the number may float around to be slightly greater than one of slightly less than one depending one because of the accelerometer not being 100% precise). For a number accelerating quickly it will be greater than one. For a device in free fall it will be close to zero. You can get the magnitude of the accelerometer reading by getting the square root of
(x*x+y*y+z*z). The other equation worth knowing is getting the direction (in radians) in which the device is tilting along some plane. For example, if I had a device laying flat on a table and then decided to tilt it the direction in which the device is tilted can be calculated with atan2(y,x).
0 comments:
Post a Comment